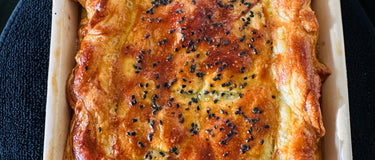
Swiss Chard & Herb Pie
Swiss chard & Herb pie (Known locally as Spinach pie) is a dish typical in Gibraltar and is probably genoese in origin.
The filling is quite firm and sets because of the eggs. This family recipe calls for making your own pastry, but this is optional if you’re short on time, by using shop-bought short crust or even puff-pastry.
Serves: up to 40 snack sized servings and is a perfect dish for picnics.
Wine pairing: A rounder white such as Pinot Gris/Blanc from Alsace will work wonderfully with this. You don’t want anything too dry or “green” flavoured as it’ll clash with the earthy notes of the chard
Ingredients
For the filling
- 1500 g Swiss chard (leaves)
- 100 g fresh oregano (or 50g dried)
- 100 g breadcrumbs
- 1 head of garlic (10-12 cloves)
- 150 g fresh parsley
- 250 ml extra virgin olive oil
- 6 eggs
- 1 tsp ground nutmeg
- 450 g mature hard edam (you can also use parmesan or a pecorino)
- 250 g extra mature cheddar
- salt to taste
For the pastry
- 700 g plain flour
- 350 g butter
- 2 eggs
- 4 tbsp water, room temperature
- Zest of 1 large lemon
- 1 tsp salt
- black sesame seeds
Method
For the filling
- Rinse the Swiss chard to remove any dirt and chop of the stalks. The stalk can be discarded but can be used for soups or other dishes, but please note that the stalks are not used in this recipe.
- Roughly chop the Swiss chard leaves and add to a large pan with 125 ml (half a cup) of water and a pinch of salt on a medium heat in order to wilt the leaves. (5 -10 mins.) Once the leaves are wilted put them in a colander or sieve for them to cool and let the liquid drip through and discard. The leaves don’t need to be completely wilted because they will be baked in the oven, just enough for them to soften.
- While the Swiss chard is cooling (in the fridge if you’re in a hurry), finely chop the garlic cloves (peeled), the oregano and the parsley. This can be done in a food processor to save time, then place in a large mixing bowl.
- Now Add the grated cheeses, nutmeg, a teaspoon of salt and the breadcrumbs and mix it all together. Place aside.
- With your hands squeeze hard the (now cooled) Swiss chard through a Muslin cloth to remove as much water as possible. Really have a good squeeze and treat it like a workout.
- Chop the squeezed Swiss chard ball finely and add it to your mixture, you’ll be surprised how small the amount of chard has now become because of the removed water content.
- Beat your 6 eggs in a separate bowl with a tablespoon of extra virgin olive oil, then add to your mixture.
- With your hands mix all the ingredients in the bowl so the filling comes together nicely. Doing it by hand is much easier than doing it with a spoon and you really get a feel that the ingredients are well combined and the smell of the fresh herbs will start to hit you.
- Once it is combined you can taste it for seasoning, but take into account that the cheese will provide extra saltiness and savouriness once baked.
For the pastry
- Mix the flour and salt with the butter at room temperature so it becomes a sandy consistency, much like a crumble mix.
- Beat the 2 eggs, add the water and the lemon zest and add to the flour mixture. Mix it all together and a dough will form. You can either do it in a food processor or by hand, depending on your stamina.
- Let it rest for 20 minutes. Then divide the dough ball into two, but one part (for the pie base,) should be slightly larger than the other.
- Start to stretch the larger portion with a rolling pin. For this size pie it may be a bit too big to work with so you can always do this in two parts and then join the sections together once they’re in the pie dish. Roll it out until it is about half a centimetre thick.
Constructing your pie
- The pie dish should be greased with butter and have a light dusting of flour. You can use a non-stick teflon lined tray if you have one, it will bake more evenly and slightly quicker than if you use a Pyrex glass dish.
- Roll the pastry off your rolling pin over the top of the dish and then let it fall into the dish slowly, push it down gently with your fingers to form a base layer (join your parts together if you had to roll them out in smaller sections) Prick your pastry base every 5cm or so with a fork to ensure it bakes evenly, this reduces your risk of a soggy bottom.
- Spoon the pie filling on top of the pie pastry base and spread it out evenly.
- Now use a pastry brush to paint with milk where the two sheets of dough will join together around the edge to enable you to form a seal. Roll the rest of the pastry to the same depth (about half a centimetre) and again fold it off your rolling pin on top of the pie filling mixture and crimp the edges all around either with your fingers or use a fork. Cut off any excess pastry with a knife. (you can get creative here and make some leaves to decorate the top if you fancy it.)
- Using your fork, pierce the top of the dough lid every 5cm. This ensures your lid doesn’t collapse and stays nice and crispy.
- Using your pastry brush, paint the top with milk and scatter a few black sesame seeds over the top to decorate.
- Bake in a preheated fan oven for 35-40 minutes 180C (355F) until the crust is an even golden-brown colour.
- Allow to cool completely at room temperature. This pie is served cold.
.
If you enjoy creating and eating this pie, please remember to take a photo of yourselves enjoying it and you can tag us on instagram @jonskitchentable or on Facebook @theburnthillherbco